Stages of Video Editing

Footage Assembly (Building a sequence)

Import footage into Adobe Premiere Pro and check through footage for usability, ensure the footage that is being used in the exact footage desired by re-watching everything that is being added in. Then bring all of the footage into a timeline, in order. To refine the sequence, cut the footage as necessary using the razor tool. Them the footage should be trimmed if necessary, using the red bracket tool. Create a sense of rhythm to your edit by ensuring it flows well and that there are no sudden cuts, it should all blend together, additionally, don’t have too much, if any ‘dead air’, this will also aid the flow of the film.

 Building a Soundtrack

Create a suitable ambience track for the entire scene. Then add dialogue using automated dialogue replacement. Then add some Foley sound effects and music if necessary. ‘L’ cuts and ‘J’ cuts should them be bridged and the volume should be mixed by using the sound levels. For example, if a particular audio file

Adding Titles

Use the title tool to create simple titles or use Adobe Effects to create animated titles. Adobe Effects can be used to create a title that is more unique.

Colour Correction Grading

  • Correct colour temperature (white balance). Blues can be used to create a colder, unhappy atmosphere and warm tones such as yellows or oranges can be used to create the opposite; a happy atmosphere. The contrast can also be changed using curves, however it is important to ensure that colour grading is subtle, because the footage will look too artificial otherwise.

Colour Correction and Colour Grading

Colour Correction

  • Colour correction is the process of manually changing such things as colour temperature, (also known as white balance) and exposure amongst other things. Because filming is never going to be perfect, this is a necessary stage, as it will make the end product of all the scenes look more professional.

However, it is usually considered that shooting flat will give more room to move in post-production. Shooting flat means having as little-in camera processing on the image when filming. An easy way to colour correct is to use the fast colour-correct effect in Adobe Premiere.

When colourists are editing a movie to get the perfect correction and colour, they watch it in a cinema while doing so to get an actual sense of what the audience would be seeing in a cinema. The colour correction technique has to be seamless, not different colours or saturation in each scene. Furthermore, they can make certain scenes that were shot in the evening look like it was shot in the afternoon or scenes that were shot earlier in the day, look like nighttime shot.  They also play the score/soundtrack while editing this to see if the colours match the mood of the music, for example, a happy, uplifting song would require warmer tones in the scene.

Colour grading refers to making further alterations after correction. This stage is not seen as correction mistakes, but more as adding style to the footage. By selecting the colour correction in Adobe Premiere, there is an option to use scopes and waveform that give a visual aid to the changes being made.

The Process

  1. Edit the footage into a sequence and remove any noise or artefacts that are not wanted in the footage.
  2. Correct the colour temperature (white balance).
  3. Adjust the blacks (shadows) and the lights.
  4. Adjust the mids (every colour but black and white) to make sure that things such as faces stand out. This can be done using the 3-way colour corrector effect.
  5. Add any appropriate filters, this is no longer correction, but instead grading.

Lookup Tables (LUTs)

LUT (Lookup Table) is essentially the modifier between two images, the original image and the displayed image, based on a mathematical formula. There are different types of LUTS – viewing, transform, calibration, 1D and 3D. The three colourists go into a lot of detail on all them.

Image result for lookup table  Related image

Adjustment Layers – Layers that will lie over the entire film (or entire sections) to alter on a larger scale. This can include such things:

  • Colour presets
  • Exposure presets
  • Film grain
  • Vignettes
  • Distortions

Creating a Soundtrack

Making a Sound Effects List

  • Make a list of all the sound effects, then these are to be recorded or obtain. Choose a soundproofed room to record in and find decent microphone to record the audio. Then, when editing, remove existing audio and unlink audio from video. Then delete any unwanted clips and add the ambience track or sound bed. Collect a series of background noises in the original audio and lower the volume to barely audible, then the sound effects need to be layered.

Automated Dialogue Replacement 

The dialogue that is going to be replaced needs to be written down, then multiple versions of this audio needs to be recorded. The video should be used for reference if possible.

Creating Foley

Similar to ADR, write down the exact sounds to be replaced and record multiple versions and use the video for reference.

Finding existing Foley

Write down the exact sound to be replaced, then original royalty free or copyright fee versions can be found and the SFX needs to be downloaded into a folder with the footage.

Music Soundtrack

a music track can be added at the end of the process, however only if the music will fit the scene, if not, music being used should be avoided, especially if the song is copyrighted, because it can be very expensive to buy a song. If this is not the case, copyright free music can be used.

Sound-bridging L and J cuts

L cut– when the audio from previous scene carries on into the next

J cut– when audio from upcoming scene starts in the previous scene

To sound bridge L and J cuts, unlink the audio and shorten either the video or the audio, depending on what type of cut is desired. The audio will now bridge the new video.


Mixing the audio

  1. Use the sound scope to the right of the timeline.
  2. Ambience should be barely audible.
  3. Dialogue should be in the green/ yellow.
  4. Background Foley should be in the green/yellow.
  5. Key Foley should be in yellow.

Foley Set-up

foley set up

In class, we attempted Foley by using a shotgun microphone and a ladder. We used the ladder to create some audio. This gave us a taster of what creating Foley sound effects is like. Even though it can be quite enjoyable, it takes a lot of time, effort and editing. Therefore, in my own work, to save more time, I would focus more on gathering royalty free/ copyright free sound effects online.


Introduction to Sound in Film

Automated/ Automatic Dialogue ReplacementRecording the dialogue in post-production, otherwise known as looping. It should be recorded while watching the edit. ADR is used to replace the actor’s vocal performance from the original scene and replaced with the new dialogue that has been recorded in a booth, this is also known as post-synchronisation.  A reason for this is because it will make a safe TV cut in addition to it fixing technical problems.  It also serves creative purposes, for example, the actor can change the style of their voice during post, in order to fit the scene more effectively. The microphones in the studio and the placement of the microphone will match the ones that were used originally while filming. Visual ADR is when the actor visualises matching the lip sync, the in audio ADR, the actor matches the sound of the clip.

Foley Sound Effect-

This is a creative way of creating sound effects for a film. For example, using coconuts to create the sound of a horse walking, or breaking wood to replicate the sound of a broken bone. Foley sound is important because it emphasises the sounds that aren’t picked up during production. For example, it isn’t possible to pick up the full audio of human footsteps, therefore recreating the sound and adding it in makes the sound richer and more noticeable. Therefore, this will add more effect to the scene. However, the problem with Foley sound is that it is a very long process and the Foley artists have to be extremely precise.

Music-

When using music in film, it isn’t just a piece of popular music. There can also be an underscore. This is just the music or sounds that play in the background of a movie or a TV show. Creating and underscore requires a careful understanding of the action on the screen and the importance of the scene in the overall narrative.  However, trying to get popular music in movies/ TV shows can be very difficult because these songs are expensive to buy for the movie, therefore the filmmakers need to have the budget to purchase the songs. If the filmmaker is independent and making the film on a low budget, they have to ensure that all the music they are using is copyright free.

Ambience track/ sound bed.

Sound Bridging is when audio bridges over two visual clips. There should be multiple layers (including ambience), this ensures that the cut of the audio cannot be heard, it will blend all of the audio to together to get it sounding smoother.

Mixing sound together-

  1. Add ambience first.
  2. Add the Foley and dialogue.
  3. Put the music behind (if appropriate).
  4. Mix the volume of each track using the levels.

There should be multiple audio tracks.

Video Production Techniques

There are multiple types of camera angles when it comes to media. But before anything is done, the production crew has to ensure that they have the essentials down when setting up the camera. Firstly, the battery needs to be fully charged, the card formatted, the white balance at the correct setting, the correct lens focal length, the pixel aspect ratio and the frame rates and the light meter are all set up properly to match the scene being filmed.

Panning – the first type of camera movement in the pan. This is when the camera is when the camera is in a fixed position swivelling a still or video camera horizontally. This motion is similar to person turning their head from left to right. This movement is effective for following a character walking down a street or for a point of view shot.

Tilting- This movement is similar to a pan except it is just portraying a subject by tilting the camera vertically. Tilting is less common than panning because humans associate more with move left and right instead of up and down.

Trackingthis movement is any shot where the camera follows backward, forward or moves alongside the subject that is being recorded. In cinematography, the term refers to a shot in a which the camera is fixed to a camera dolly (which is placed on wheels), this creates a smoother shot.

Contrazoom (Camera and Lens Movement this is an unsettling in-camera special effect that appears to undermine normal visual perception. This shot was originally used by Alfred Hitchcock in his film, Vertigo.

Dutch Angle/Canter- this is when the camera is set an angle on its roll so that the framing of the shot has an uneven horizon which creates an unsettling effect for the audience.

Crane/Jib- this shot is done while the camera is fixed onto a crane or jib. This enhances the epic nature of large sets and massive crowds/ large settings in general.

Push and Pull Focus- is a creative camera technique that involves changing the focus of a shot. This can be changing the focus from one subject to another. For example, is there are two people in the shot but only one is in focus, that person is the main subject of attention.

Snorricam– also known as a chest-cam is a camera device that is rigged to the body of the actor which is facing the actor directly. Therefore, when they walk, they do not appear to move but everything around them does.

Introduction to Filmmaking

Production- Camera Setup

  • Pixel Aspect Ratio- 720/1080/4k- figure relates to how many pixels the image is; more pixels, better the quality. Settings > video settings > resolutions >alter.
  • Frame rates-24fps (main)/30fps/50fps/50fps/60fps (frames per second)
  • ISO (native ISO/ below 640)
  • Shutter speed-1/50 for decent light or 1/25 for low light. – double your frame rate
  • Card Format- delete all data and sync card and camera.

Production- Shot Reverse- Shot

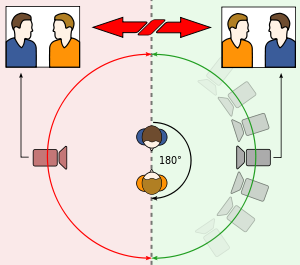
180-degree rule

Image result for 180 degree rule

  • The 180-degree rule helps the audience interpret where characters are in a scene without seeing the full set. If you want to disorientate your audience, break the 180-degree rule, however if the rule were to be broken without the proper intent, it would just confuse the audience and the scene would not come together properly.

Production- Lighting the scene.

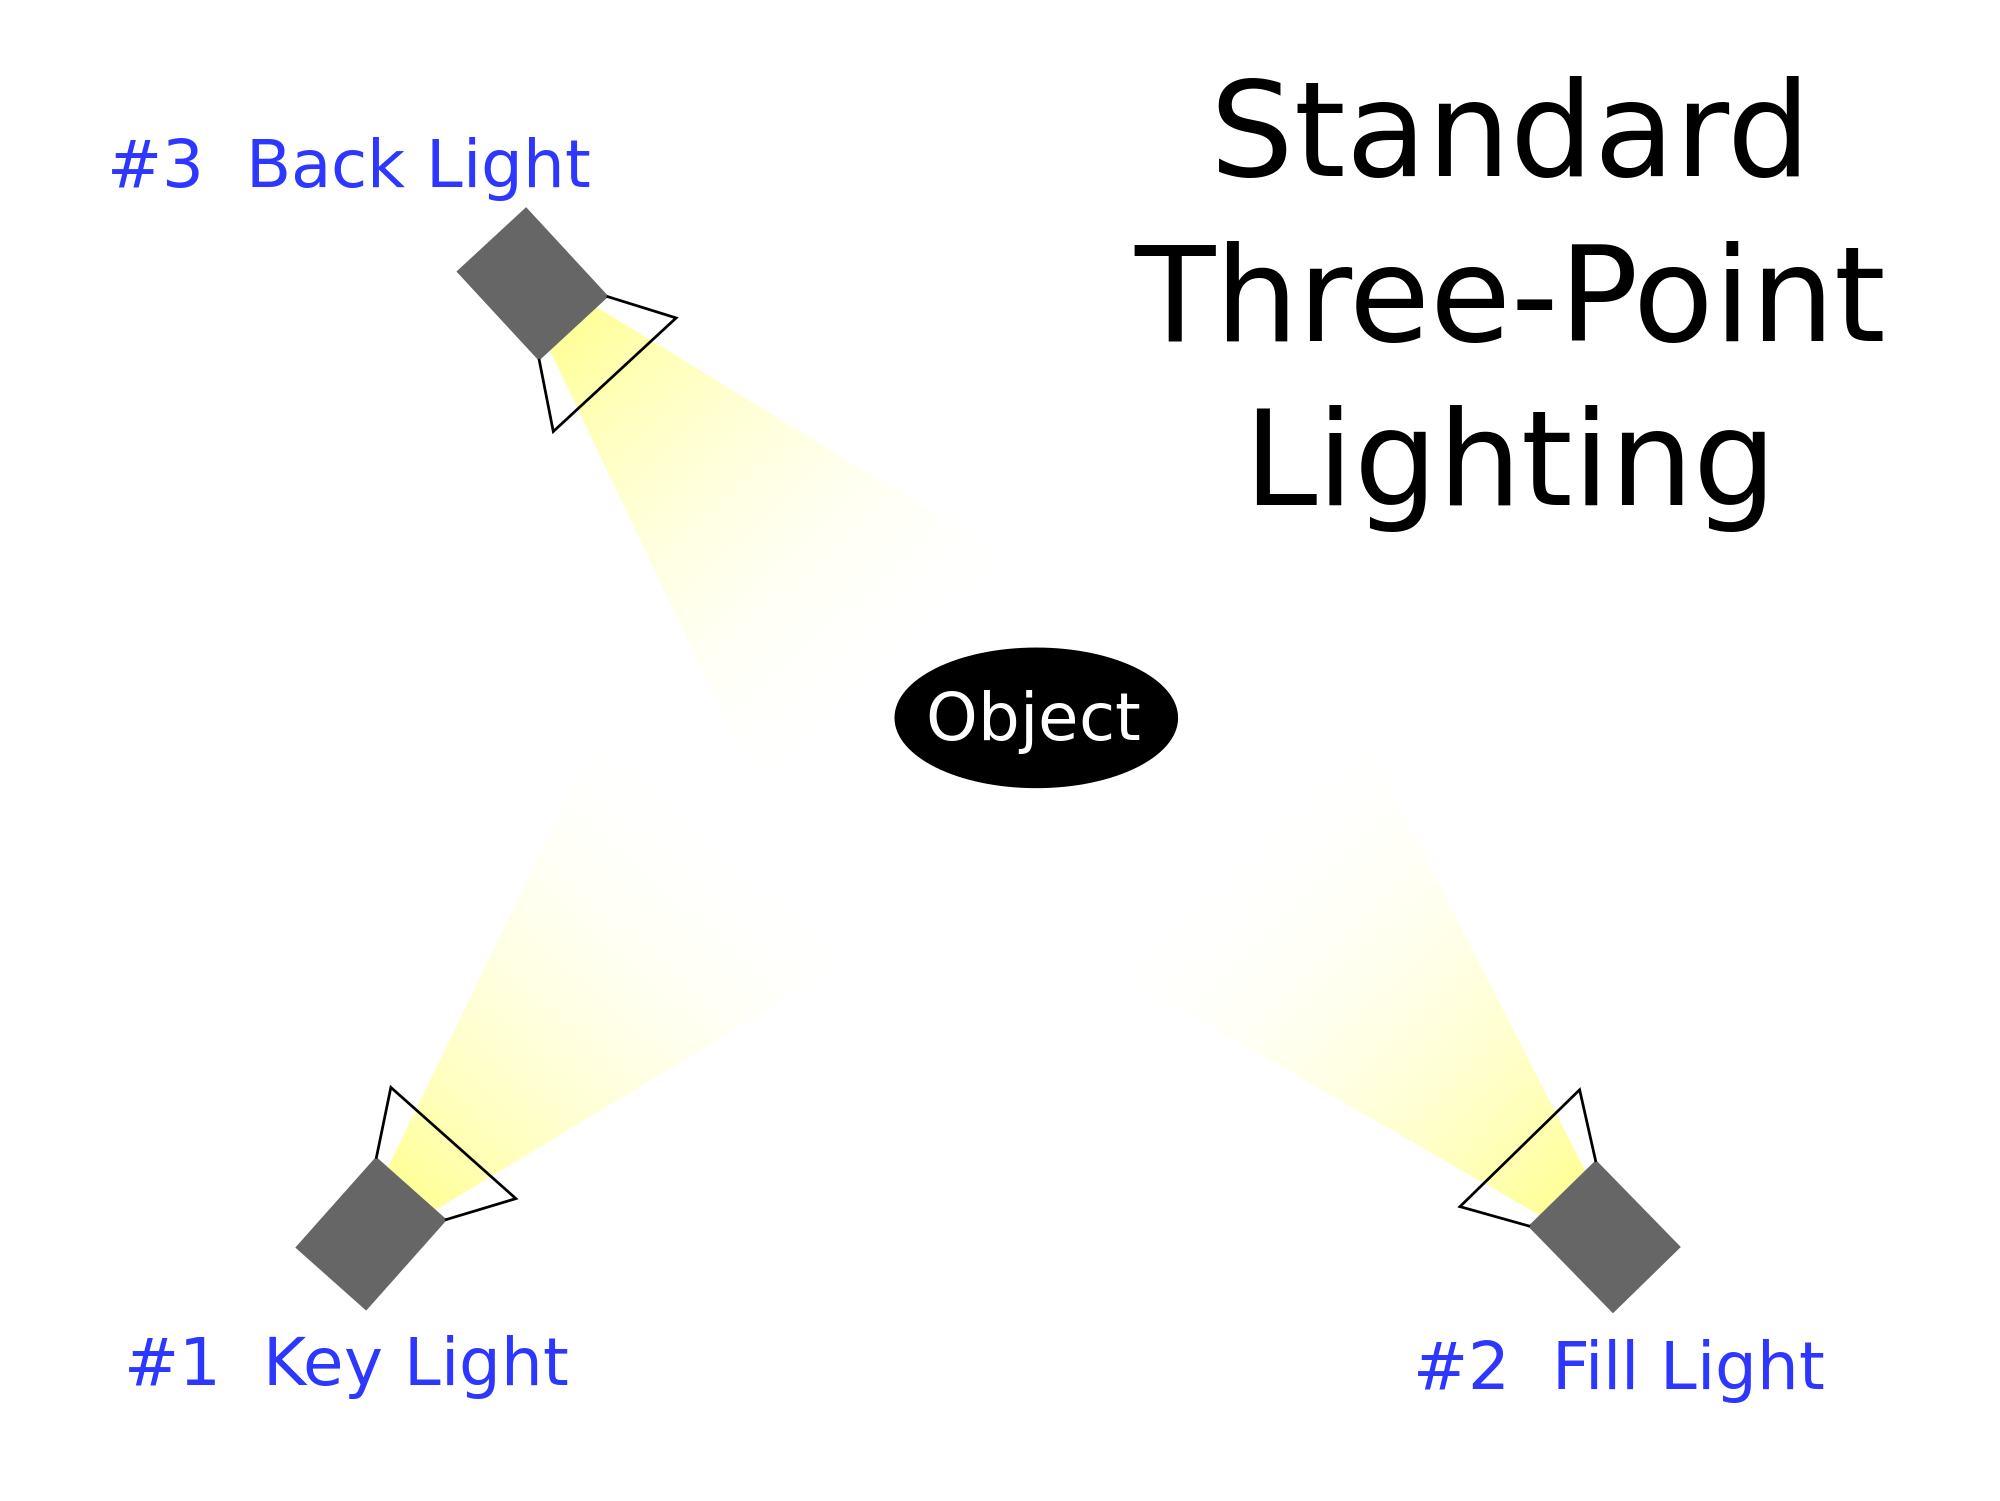
Three-point lighting uses a back light, a key light and a fill light. Of course the lighting can be changed if the scene is intended to be darker or lighter, but to light the whole subject, this is how it would be done.

Post-production- Setting a project up-  When setting a project up the save location should be secure and sizeable, the scratch disks and media cache has to be saved to the same location. In post-production, it has to be ensured that the sequence to match the camera/footage settings. Lastly, the work space windows have to be set up accordingly.

Stages of editing

  1. Footage assembly and refining sequence.
  2. Building a soundtrack
  3. Titles and graphics
  4. Special and visual effects
  5. Colour correction and grading
  6. Extras (vignette, overlays and presets, LUTS etc.)