Introduction to Sound in Film

Automated/ Automatic Dialogue ReplacementRecording the dialogue in post-production, otherwise known as looping. It should be recorded while watching the edit. ADR is used to replace the actor’s vocal performance from the original scene and replaced with the new dialogue that has been recorded in a booth, this is also known as post-synchronisation.  A reason for this is because it will make a safe TV cut in addition to it fixing technical problems.  It also serves creative purposes, for example, the actor can change the style of their voice during post, in order to fit the scene more effectively. The microphones in the studio and the placement of the microphone will match the ones that were used originally while filming. Visual ADR is when the actor visualises matching the lip sync, the in audio ADR, the actor matches the sound of the clip.

Foley Sound Effect-

This is a creative way of creating sound effects for a film. For example, using coconuts to create the sound of a horse walking, or breaking wood to replicate the sound of a broken bone. Foley sound is important because it emphasises the sounds that aren’t picked up during production. For example, it isn’t possible to pick up the full audio of human footsteps, therefore recreating the sound and adding it in makes the sound richer and more noticeable. Therefore, this will add more effect to the scene. However, the problem with Foley sound is that it is a very long process and the Foley artists have to be extremely precise.

Music-

When using music in film, it isn’t just a piece of popular music. There can also be an underscore. This is just the music or sounds that play in the background of a movie or a TV show. Creating and underscore requires a careful understanding of the action on the screen and the importance of the scene in the overall narrative.  However, trying to get popular music in movies/ TV shows can be very difficult because these songs are expensive to buy for the movie, therefore the filmmakers need to have the budget to purchase the songs. If the filmmaker is independent and making the film on a low budget, they have to ensure that all the music they are using is copyright free.

Ambience track/ sound bed.

Sound Bridging is when audio bridges over two visual clips. There should be multiple layers (including ambience), this ensures that the cut of the audio cannot be heard, it will blend all of the audio to together to get it sounding smoother.

Mixing sound together-

  1. Add ambience first.
  2. Add the Foley and dialogue.
  3. Put the music behind (if appropriate).
  4. Mix the volume of each track using the levels.

There should be multiple audio tracks.

Video Production Techniques

There are multiple types of camera angles when it comes to media. But before anything is done, the production crew has to ensure that they have the essentials down when setting up the camera. Firstly, the battery needs to be fully charged, the card formatted, the white balance at the correct setting, the correct lens focal length, the pixel aspect ratio and the frame rates and the light meter are all set up properly to match the scene being filmed.

Panning – the first type of camera movement in the pan. This is when the camera is when the camera is in a fixed position swivelling a still or video camera horizontally. This motion is similar to person turning their head from left to right. This movement is effective for following a character walking down a street or for a point of view shot.

Tilting- This movement is similar to a pan except it is just portraying a subject by tilting the camera vertically. Tilting is less common than panning because humans associate more with move left and right instead of up and down.

Trackingthis movement is any shot where the camera follows backward, forward or moves alongside the subject that is being recorded. In cinematography, the term refers to a shot in a which the camera is fixed to a camera dolly (which is placed on wheels), this creates a smoother shot.

Contrazoom (Camera and Lens Movement this is an unsettling in-camera special effect that appears to undermine normal visual perception. This shot was originally used by Alfred Hitchcock in his film, Vertigo.

Dutch Angle/Canter- this is when the camera is set an angle on its roll so that the framing of the shot has an uneven horizon which creates an unsettling effect for the audience.

Crane/Jib- this shot is done while the camera is fixed onto a crane or jib. This enhances the epic nature of large sets and massive crowds/ large settings in general.

Push and Pull Focus- is a creative camera technique that involves changing the focus of a shot. This can be changing the focus from one subject to another. For example, is there are two people in the shot but only one is in focus, that person is the main subject of attention.

Snorricam– also known as a chest-cam is a camera device that is rigged to the body of the actor which is facing the actor directly. Therefore, when they walk, they do not appear to move but everything around them does.

Introduction to Filmmaking

Production- Camera Setup

  • Pixel Aspect Ratio- 720/1080/4k- figure relates to how many pixels the image is; more pixels, better the quality. Settings > video settings > resolutions >alter.
  • Frame rates-24fps (main)/30fps/50fps/50fps/60fps (frames per second)
  • ISO (native ISO/ below 640)
  • Shutter speed-1/50 for decent light or 1/25 for low light. – double your frame rate
  • Card Format- delete all data and sync card and camera.

Production- Shot Reverse- Shot

180-degree rule

Image result for 180 degree rule

  • The 180-degree rule helps the audience interpret where characters are in a scene without seeing the full set. If you want to disorientate your audience, break the 180-degree rule, however if the rule were to be broken without the proper intent, it would just confuse the audience and the scene would not come together properly.

Production- Lighting the scene.

Three-point lighting uses a back light, a key light and a fill light. Of course the lighting can be changed if the scene is intended to be darker or lighter, but to light the whole subject, this is how it would be done.

Post-production- Setting a project up-  When setting a project up the save location should be secure and sizeable, the scratch disks and media cache has to be saved to the same location. In post-production, it has to be ensured that the sequence to match the camera/footage settings. Lastly, the work space windows have to be set up accordingly.

Stages of editing

  1. Footage assembly and refining sequence.
  2. Building a soundtrack
  3. Titles and graphics
  4. Special and visual effects
  5. Colour correction and grading
  6. Extras (vignette, overlays and presets, LUTS etc.)

Photography Evaluation: Coffee Table Book


Prior to this project, I completed research that would aid some of my ideas for what I would be doing. I researched into nature photography and the tips that other photographers were giving in order to take the right type of picture. I did a research fact file that helped me to do the whole project. I researched factors in photography such as the right type of ISO to use in certain types of lighting in addition to aperture and shutter speed. I also picked up tips such as not to disturb the nature around you while you are taking pictures, furthermore I discovered that landscape photography is the most common type of photography, therefore I wanted to include this yet take too many pictures in this style as I know that this is what people are used to seeing, therefore, I ensured that I used different photography styles such as portrait when taking pictures that people were in and using different angles to create a sense of individuality with each type of picture.

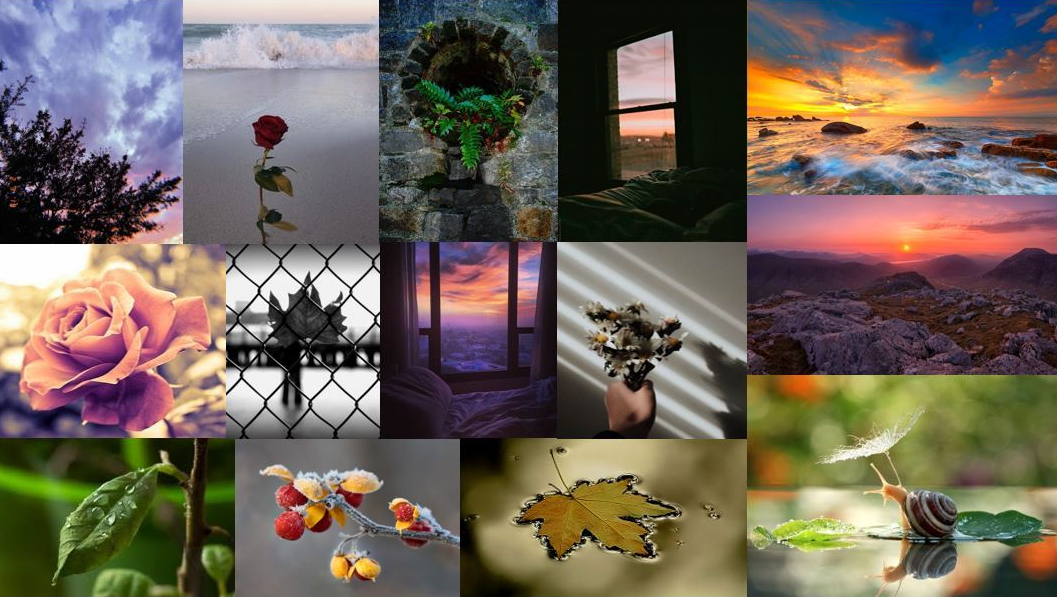
Within this project, I chose to do the theme of nature. However, I wanted to ensure that I was creative with the pictures I was taking, I did not just want to revolve my pictures around one type of nature photography, such as just focusing on landscape, close ups or one type of area such as a forest or a beach. I wanted to ensure that I could combine as many types of nature photography as I could in order to achieve the type of creativity I desired.

By making this project unique, I combined things such as ‘human nature’ which was using a model and getting them to pose with a bouquet of flowers. By doing this, I feel like I took a different turn on nature photography as I was combining human life as well. In retrospect, I see this as being effective to my work as I know now that it was a more unique option of portraying my work. I feel like these images are more interesting to look at instead of the average close up of flowers or landscapes.

When sticking to a theme such as nature for a photography project, it can be easy to assume that there is not necessarily a lot of ways to make the pictures creative or different to what you would normally see within this topic. However, by doing things such as using other people in your photos, or even just taking pictures of the ‘nature’ that is in the home, which is what I did as well. I took pictures of the house plants that we have, the flowers and even things such as crystals, etc. This still counts as nature; it is just not outside in the typical setting. This is another way in which I attempted to make my work just slightly more unique and intriguing.

Additionally, editing also plays a big role in how my images turned out. I applied editing to some pictures more than others. For example, I would just simply boost the saturation on some pictures to bring out the colours and then just added a simple filter over it to complete the image. However, for some, I tried to do more with them. For example, overlaying two images together. I never originally intended to do this but when editing I decided to try out new styles of presenting my images. There were two images that worked out the best together. I wanted to do this type of effect with more pictures, however, these are the only ones that I believed looked the best.


To further this, I tried to create a different theme for each ‘page’ of the coffee table book. I believe that this made this book more like a photographic story which made this more inviting for the audience to follow, in my opinion.

In regards to the way in which I took the photos, I experimented with many different settings to ensure that I could get different outcomes with my pictures. I did not just want to take the same type of pictures. I mainly used the manual mode so that I could adjust ISO, aperture and shutter speed to my own liking, as in some situations it was easier this way, for example, when it was darker or when I wanted to take some long exposure shots, which I tried doing often with sea water. However, I would have to say that long exposure is what I struggled with the most as I found it difficult to find a setting that would truly capture the exposure that I wanted.

I did not use a tripod for any of my pictures, but now in retrospect, I realized that for some of the pictures that I took would have been a lot easier to take if I had just used a tripod, for example, some subjects of the pictures would’ve been easier to position as I could’ve placed them slightly further away from the camera and got more of it in. Also, some images were slightly tilted which I had to fix while editing.

Another way in which I would improve this project would’ve been to visit more locations in order to get a more of a variety of pictures in regards to nature. However, to fix this issue, I still managed to use a sufficient amount of locations in order to avoid making all of the pictures look the same, but it would’ve added more to my work if I could have gotten pictures of wooded landscapes or even different types of plants and scenery.

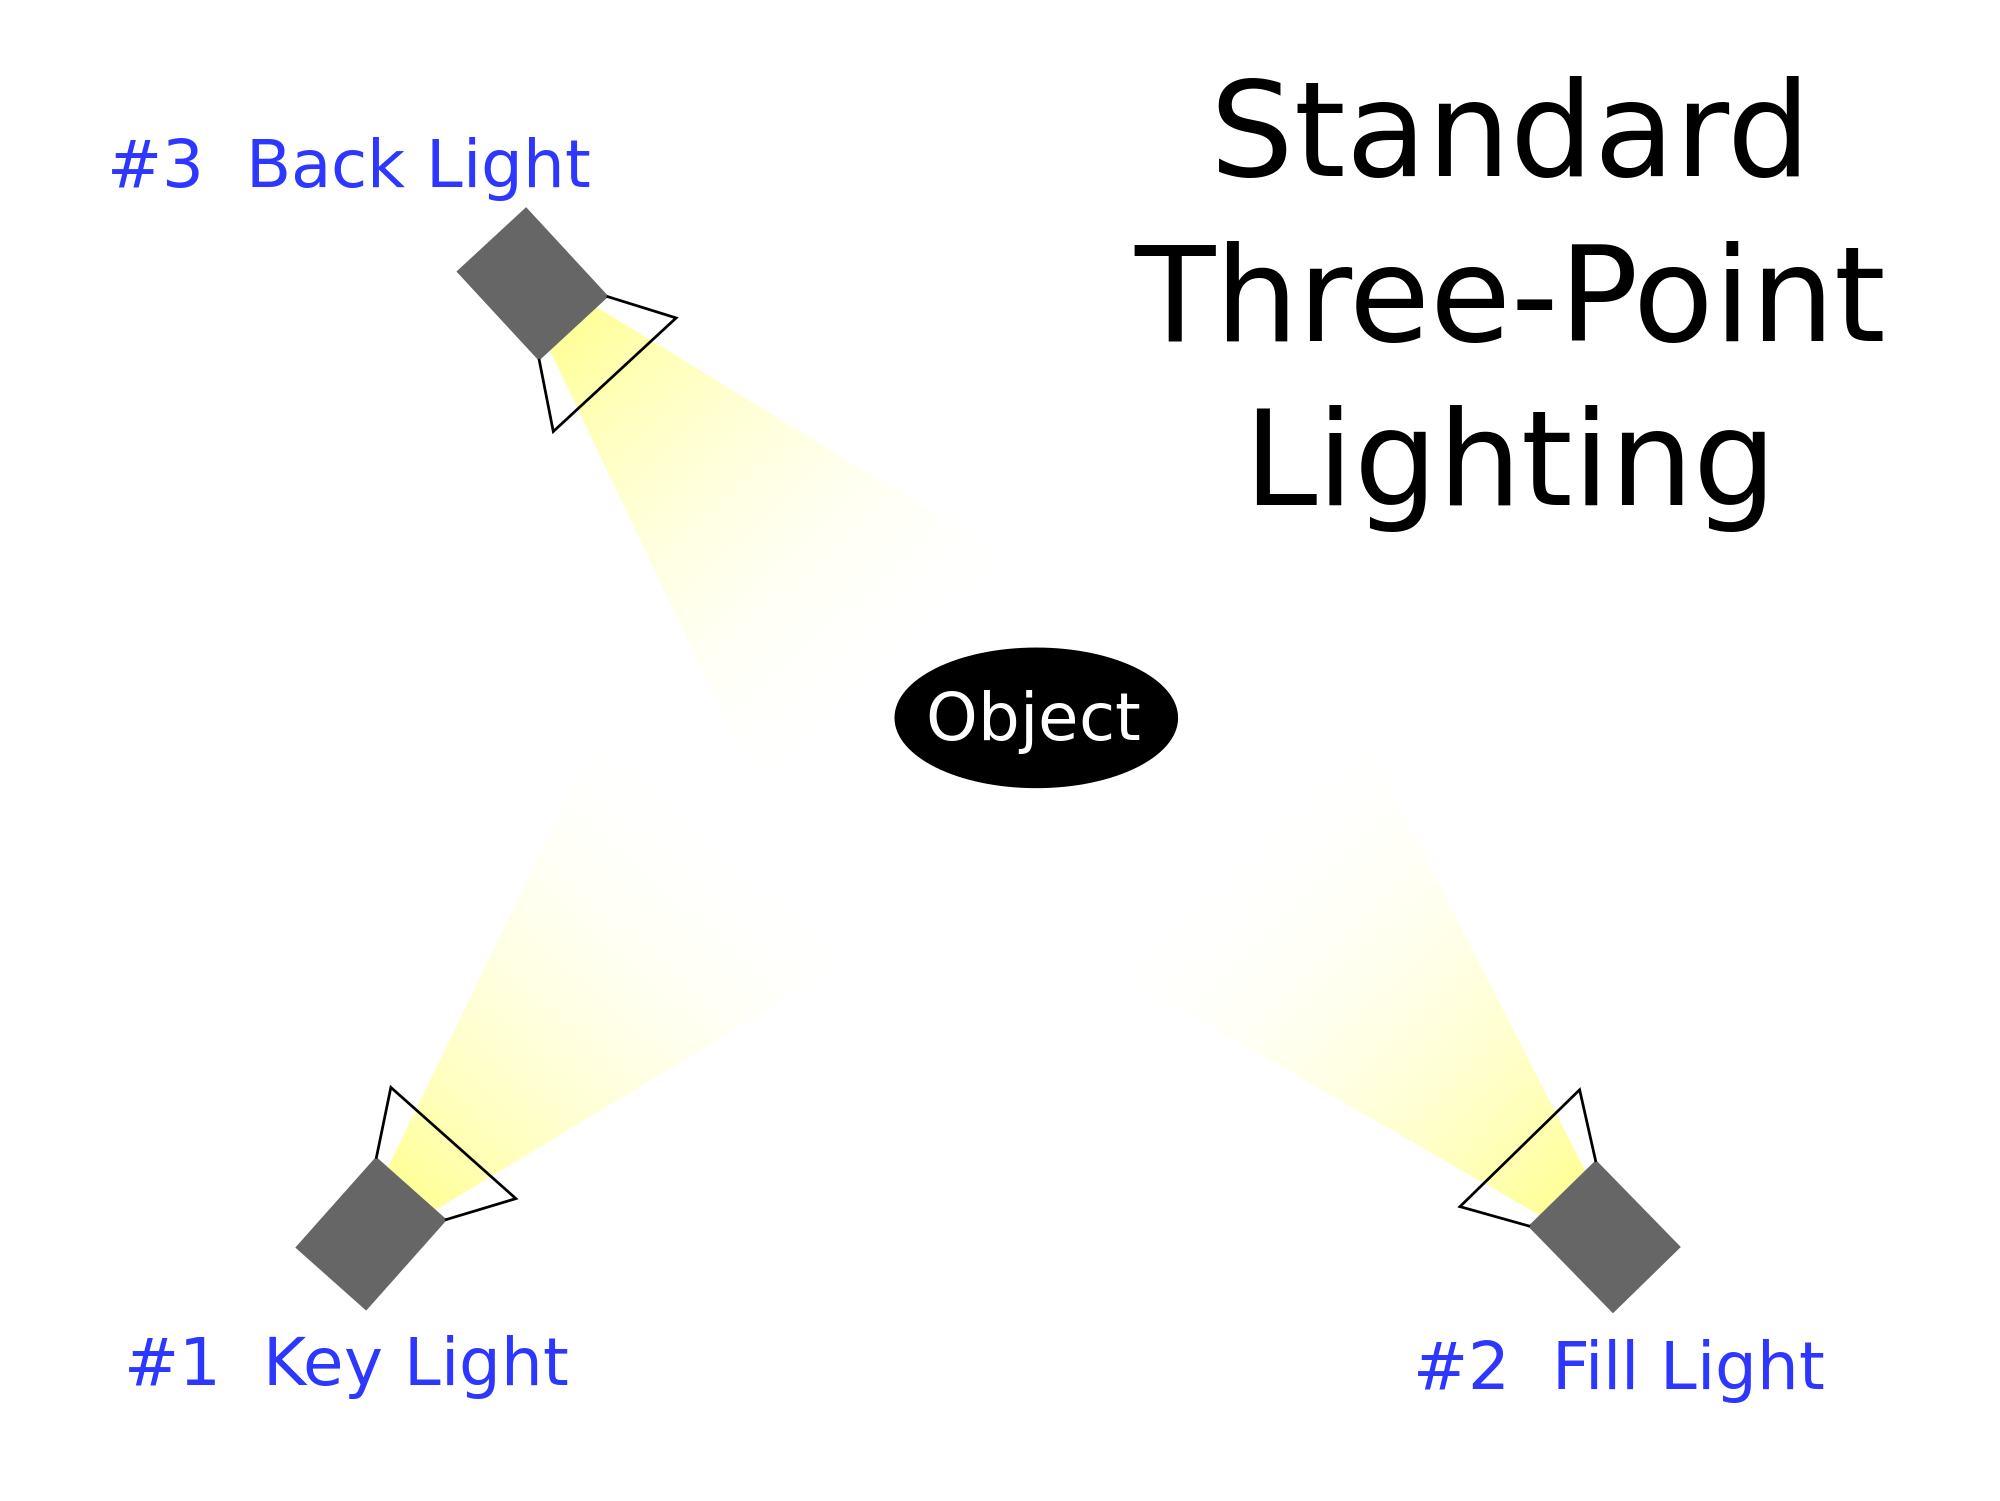
Furthermore, when taking some of the pictures, I used some different lighting techniques in order to illuminate the subject of the picture and bring out the colours of it more. I also used the flash on the camera to aid the lighting of the locations I was in.

Peer Evaluation

I got a lot of good feedback of from my peers on my work, that gave me a better idea of what I did well and what I should improve. For example, one stated that I had a good variety of images and he thought they were all of a good quality. Someone else stated that they enjoyed the layout of my coffee table book and the themes that I applied to my images, additionally they stated that they liked my creativity of my work. However, they also stated that some of my pictures looked similar to one another, therefore I take this as them suggesting I use less pictures and focus more on the quality instead of quantity. Overall, a majority of my peers liked the quality of my table book and found the pictures interesting to look at.

Self-assessment:

Project Proposal

In regards to my project proposal, I gave myself a merit in this section as I believe that I had a good understanding and knew what I wanted to do with my project from the start of it. I stuck through with my ambitions and had a comprehensive understanding of the work that I wanted to do, and in the end, was overall happy with the work that I produced.

Research Folder

For the research folder, I gave myself a pass as I believe that I only gained the sufficient amount of research that I needed instead of going further and gathering more. However, I still gave the source of my data and the date it was found or the date that I found it if I couldn’t find the original date of the source. The reason for me not going further and getting more information was mainly because I gathered all of the research I believed that I needed in order to continue with this project. Furthermore, I also focused on other aspects such as the risk assessment, photographic, storyboard and the location reconnaissance.

The Finished Product

Concerning my finished product, I gave myself a distinction grade. This is because I put my full effort into getting all the pictures I wanted and needed in addition to making the table book as aesthetically pleasing and professional as possible. Each page, had its own theme, for example, I gathered images and labelled them titles such as ‘The Fairy Garden’ or ‘Twilight Zone’ and put them on the same page to create that particular theme. I wanted to make this seem more like a story so that it captivated the audience enough to want to look at the next page. Each page differed from one another which is what I think makes this book more unique. I think my work was imaginative, has aesthetic awareness and the flexible, processes, skills and knowledge applied in extensive enquiry to develop creative solutions.

The Evaluation

In regards to this evaluation, I decided to give myself a merit as I think I have given an effective communication of analysis of my work. I have been thorough and honest with my self-reflection and have given the strengths and weaknesses of the work that I produced and how I could improve. I also gave an insight to the process I went through to achieve the end product of my work.

Overall, I would give myself a merit on this work as I believe that I put in a lot of effort to get what I wanted. However, I do not think that it had enough variety in my pictures and editing in order to achieve a distinction, however I do think that I met all of the criteria for the merit grade and some of the criteria for distinction. Therefore, I am happy with this grade.
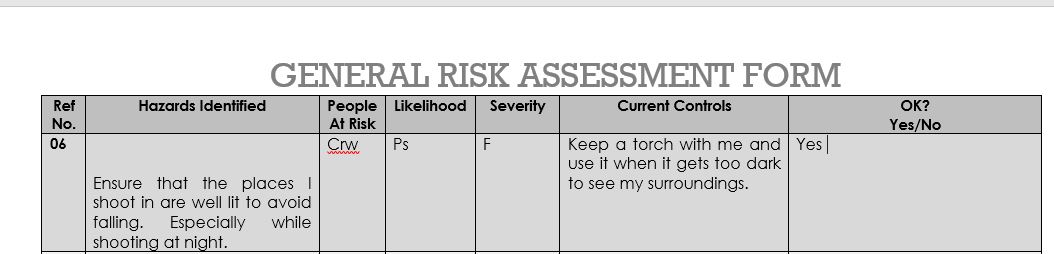


Coffee Table Book Production Diary-3

The Storyboard

I completed a pictorial storyboard in regards to helping me create my coffee table book. It gave me the ideas for most of the pictures I took.

storyboardstoryboard 2

The Process of Taking and Editing Pictures

After I was done taking pictures, I ensured that I edited them on the same day that I took them as this means that I could go along with the rest of the process at a good pace, so that when it came to putting these pictures into the InDesign document, it wouldn’t take that long.

When it came to editing, I edited all of the pictures using the VSCO app. I used the many different filters to bring out the colours of my images. I also boosted the saturation and contrast and lowered the exposure to make my images more defined and to bring the colours out to portray my nature theme.

I also used the app PicsArt to add effects such as lens flares and to merge two images together to add more detail to my images.

Assistive Technologies


  • Assistive Lightroom– advanced editing tools including curves and colour mix tools. Selective editing healing tool and perspective correction. Get consistent looks by copying your favourite edits to an entire album of photos. Adobe Creative Cloud syncs edits between iPhone, iPad and the web. It captures RAW format images.

After using this particular app has been similar to working on Photoshop, except it is on your phone. It is useful for adjusting aspects of your pictures such as the vibrance, clarity, sharpening and more, you also adjust the colouring which helps bring the image to life. However, to make the app more effective, I think that filters should be added so that the photo’s editing process can be sped up as this app takes a while to use.


  • VSCO– Not only editing app, it also has and built-in camera with manual controls. These alter shutter speed, ISO and white balance.

This app serves more of an aesthetic purpose, in my opinion. When editing my own pictures, I go through the many already-made filters and choose one that I believe suits the picture the best, additionally, you can also adjust the exposure, contrast and even add tints or a grain to your photo. So it takes a while to find what you prefer, however in the end, you are left with a very aesthetically pleasing photo. I personally believe this editing app is the best out of all of the apps I have used because I think that is has more variety and I like the amount of filters that the app has to offer.

  • Miops– Connect your DSLR to simply techniques such as time-lapse, long exposure and other creative photography options.
  • When experimenting with this app, we plugged in a phone through a headphone jack to a camera, then we got someone to stand in front of the camera and scream to activate the camera, the sound of the scream will then make the camera take a picture. This app is particularly useful for when you are photographing things by yourself and want to take timer based pictures. It also gives more freedom and creativity to the photographer.
  • Snapspeed– It’s great for everyday photo editing, including exposure, colour, cropping and sharpening. It also has tools for advanced photo editing. These include curves, brushes and selective editing. And the healing tool removes unwanted subjects from photos.

I find this app very similar to other editing apps, therefore there is not anything that is particularly standing out to me, however, I do like the filter range, I think the editing tools can give a more cinematic look to your images. It also has more variety of editing tools.


Questionnaire Analysis- Coffee Table Book

Questionnaire Analysis- Coffee Table

1

In my first question, I asked the audience how old they are to get a basic feel for the age range, and as the results show, the majority (66.7%) are 16-25 years old. I had no one above the age of 56 answering and the lowest percentage were 46-55 year old’s. This shows that, my main audience are in the younger category, therefore, I have to keep in mind that these are the majority of people answering my questions.2

In this question, the overall results showed that fashion was the most favoured type of photography by getting 44.4%. However, in order for me to do this for my coffee table book, it may be difficult; even though I have access to a studio, finding the fashion and people to model the fashion will most likely not be easily accessible and if I did attempt this in my project, I do not think it would present my full potential in regards to photography as it would look too amature. Therefore, I need to choose between the two second choices that I have, either nature/ wildlife photography or portrait photography. To make my work it’s best standard, I think nature-based photography will be the easiest pictures to attain and it’s the type of photography that would look the best. 3

In this question, it showed that 100% of the people who answered, likes long exposure used in photography. Therefore, this is something to consider when doing my own work, I might include some long exposure and combine it in nature photography, if it is possible to link the two because this is clearly something that is aesthetically pleasing to people.


3

In this question, it showed that a fair amount of people like leading lines, as the majority voted yes (55.6%). However, the ‘No’ vote is not much lower than this as it is 44.4%, therefore leading lines is not necessarily something that I am going focus on, however there is a possibility that I will still include leading lines.4

Direct sunlight in photography proves to be something that people like to see as the overall vote on this is 89.9% and only 11.1% voted no. therefore this is definitely something I will use in my project as it links up closely with nature anyway.6

Light painting, is overall something people want to see being used in photography as the yes vote is 66.7%, however, 33.3% still said no which is about halfway under the winning vote. Therefore, light painting is not something I will focus on seeing as it does not really relate to nature, additionally long exposure is similar to this and that is something I intend to use.7

Fashion photography is more favoured (55.6%) over nature/wildlife photography (44.4%). However nature is not extremely lower than fashion therefore I am still motivated to use nature photography in my coffee table book as I know that people will still enjoy looking at these pictures.


8

Gregory Crewson’s picture seemed to capture people’s attention the most (55.6), most likely because it was the only picture out of the photographers that was in colour, however Ansel Adams and Michael Testino, came in at second place (both getting 22.2%). However, Don McCullin got no votes, which means that war-based photography is not something people prefer. For my project, I will most likely try to combine Crewson’s and Adam’s style of photography by still using the nature landscape effect but using light and colour effectively to add more emotion to the pictures.10
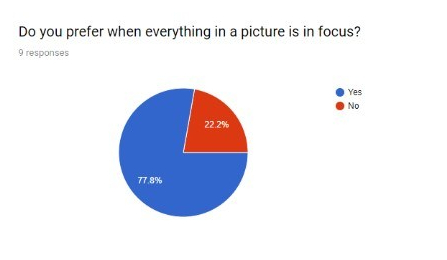
77.8% of people who answered this question prefer when everything in an image is in focus. Therefore, when conducting my own project, I will ensure that I use a narrow aperture to capture everything in the shot in focus. However, I might still experiment and take some wide angle picture mainly because I think that it will make the pictures more interesting instead of just using pictures of the same style.

black and whitye

It can be clearly seen that no one likes seeing pictures in black and white, which is probably why Ansel Adam’s nature photography was not everyone’s favourite, however, if it was in colour, maybe people would have liked it more. Therefore, I will ensure when doing my own  project that all of my pictures are in colour.

11


In this question, the majority of people who answered stated that overall, 26-35 year olds(55.6%)  and 35-45 year olds (44.4%) are more likely to own a coffee table book therefore, I need to aim my images at this age range, however, I think people of all ages will enjoy looking at nature-based images.